What is the WordPress admin bar?
The wireless hand hold device (WordPress) refers to the default tool that is situated at the top of the screen upon your screen when you are already logged in to the back-office, also known as your dashboard, either on the front-end of your site or within your user control panel. It would be a conveniently located link to different administrative areas of your site. It is made so that it allows rapid access to the tools you require to run and customize your site without the need to have multifold menus on your dashboard.
It might be confusing initially but to beginners it is soon seen to be a good friend in the saving of time in dealing with WordPress. It is comprised of different links that result in the development of new articles, comment, management as well as personalization of the theme of your site.
What is the WordPress admin bar?
WordPress admin bar is an embedded device that can be found at the top of the screen when you have logins on your dashboard, be it on the front-end of your site or at the same time the back-end of your site. It is a convenient jump instituting to the other administration departments of your site. It is meant to enable easy access to the tools they need to manage and customize their site without having to browse through several menus in the dashboard.
At first it may be confusing because of the beginner, yet it will be an invaluable helping hand in saving time when communicating with WordPress. It is composed of different links that allows you to create new articles, comment management or even the theme of your site would be customized.
First of all, you will have to download WordPress.
Once you’ve Download WordPress, check out our guide on how to install WordPress on localhost to get it up and running locally.
Main features of the admin bar
Logged in users and their access privileges
It is worth mentioning that the visibility and functionality provided by the admin bar is different depending on the role of the user. To demonstrate, a site administrator will be able to get more options compared to a regular subscriber. Logged in users will then be presented with options that evolve according to the degree of control that they have on the site.
Normally, it has such characteristics as quick shortcuts to any other section of the site where users have access. Therefore, even in case of having a multi-author site, every author will only see the tools they require or have a right in navigation, and it will be easier and safer.
Quick access to customization settings
In addition to navigating between the different modules of your dashboard, this bar also provides direct access to customization options . You may even make changes to the theme of your site, or modify its settings, without going out of the page you are on.
This gives a great deal of flexibility to experiment with the various appearances or settings to your site. It is as much to advantage the experienced user to find in these quick access points to customizing as it is to a beginner, who is gradually finding something.
How to customize the admin bar?
Define your needs
To save a great deal of time over time, depending on your individual preferences and those of your team, it would be worthwhile to customize the admin bar. Another method of maximizing this bar is to identify the tools that you use on a regular basis.
The addition or removal of the menus and submenus can simplify the number of clicks to perform some details to accomplish a part of the routine in managing or organizing your WordPress site.
Using plugins to improve user experience
A Several plugins can assist you to easily customize the admin bar to fit just right to your liking. There are also a popular set of user-friendly plugins, the functionality of which allows to reorganize, add or hide menu options visible on the toolbar, centering the workspace design.
This would come in particularly handy should you be running a large site and have a large number of contributors. Every user group may then have a separate layout of the admin bar, which is optimized to their duties and obligations.
How to disable or hide the admin bar?
Common deactivation scenarios
In some cases, it may be desirable to disable the admin bar on the public display of your site. It is commonly done to provide a user experience in which the visitors are used to, making the most out of the available visual space, and reducing the number of distractions created by administrative tools.
Similarly, when all the development and administration is done more behind the scenes i.e. in the dashboard itself there is no necessity in using the apparent toolbar to search pages as a visitor would.
Simplified technical methods
Disabling the display of the admin bar can be done by adding a popular approach of editing the functions.php file of your custom WordPress theme. You can disable the bar just to the non-admin user by a simple example of a code as shown below:
  // Disable the admin bar for non-admin users

add_action('after_setup_theme', 'remove_admin_bar');
function remove_admin_bar() {
if ( !current_user_can('administrator') && !is_admin() ) {
show_admin_bar(false);
}
}
The use of this technique would however need a little bit of knowledge in PHP programming and would be employed cautiously to prevent recurring clashes with other areas of the theme or active plug in.
Troubleshooting Admin Bar Display Issues
Avoid plugin conflicts
Your display problem with the admin bar may be that there is a conflict that is caused with one of the plugins you installed. Putting it offline would be the first thing to test whether the issue still occurs. In case of a bar returning, switch on one of the plugs at a time until the culprit is found.
The latter would be another point to note, which can be the presence of a poorly coded theme, which may also interfere, since there are also custom themes that contain their versions of CSS rules, which may touch upon such important elements of the site as the administration bar.
Ensure regular updates
Always upgrade WordPress, along with all your plugins and themes to minimize the chances of vulnerabilities to security attacks and susceptibility to possible bugs in the old version. Successive versions correct many bugs and it is always advisable to update your web environment.
Lastly, the utilization of the community forums surrounding WordPress would also have solutions and tips in practice that other users who have faced the same of problems regarding the way the administration bar is being presented.
Therefore, the extensive knowledge of the WordPress admin bar isn’t only beneficial in reducing the number of steps to allow safe navigation throughout the dashboard, but also has a strong customization and configuration options, which is unique to each user and needs. Although one might be small, handy, or large, flexible and suited, it is a primary pillar in ensuring easy and smooth utilization every day in the digital endeavor.
We are now one day going to deal with the WordPress dashboard. To refresh up, under WordPress you have an option of coming up with a showcase site, e-commerce site or a blog.
You can keep track of your site as well as operate it through the dashboard and therefore manage and customize your site. The following is the first section wherein I will introduce you to the dashboard in a general sense, the Articles, Media, Pages, and Comments pages.
Explore the WordPress dashboard.
Access the WordPress dashboard
Access to the administration of your WordPress site is done by going to the following address :
https://my-site.com/wp-admin
So you added wp-admin to the end of your site’s URL.
For security reasons, it is best to change this URL. Indeed, it is the default URL that everyone knows. It could therefore be susceptible to a brute force attack . It is therefore better to cover your tracks. Thus, the new URL, once modified, would take this form:
https://my-site.com/new-access (we replaced wp-admin with new-access).
To do this, you can use a plugin that will make your task easier. If you use a security plugin, check if it offers this option, this will save you from adding an additional plugin .
Accessing this page will redirect you to your site’s login page. You will simply need to enter your username and password, which you created when you installed WordPress , to log in.
Presentation of the administration interface
After logging in you will be presented with the WordPress dashboard.
The 3 main areas of the WordPress dashboard:
- The main menu , in the left sidebar
- The central part that displays the workspace, which adapts according to each menu item
- Finally, the top bar which allows access to certain settings, such as quick access to the features of certain extensions.
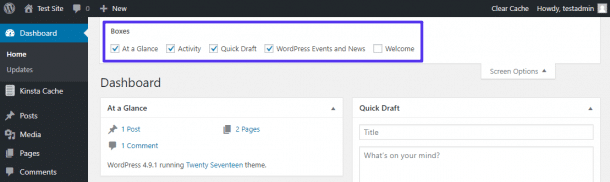
Widgets on the home page of the admin page.
On Dashboard > Home, you would have access to the home page of the WordPress dashboard.
There are widgets that allow us to access certain information such as:
- Latest posts and comments
- Site health
- Site statistics, if you have installed an extension to track visits to your pages
- etc.
You are able to drag and drop your widgets.
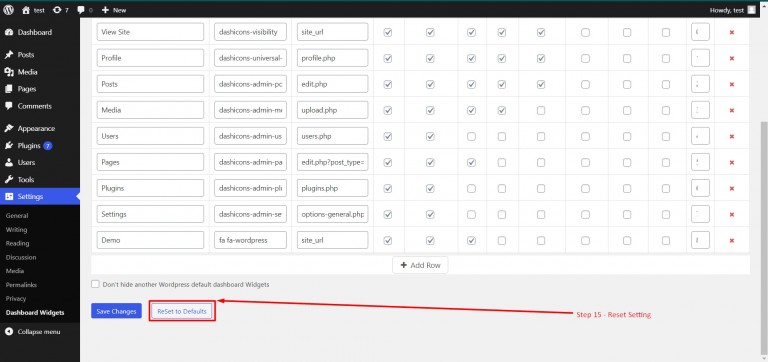
The widget options bar on the top of your dashboard has given you the choice of what you would like to be shown in your dashboard. It is possible to check and/or uncheck the box containing the properties you do not want or desire. This options menu adjusts to suit the prevailing dashboard screen.

Introducing the Sidebar Navigation Menu

Dashboard
- Dashboard > Updates: This page provides an overview of updates to your WordPress site. There are core WordPress version, updates in the plugins, updates in themes as well as updates in the translations. In case of an update, it will show a red dot.
You should maintain your WordPress platform. This article about its maintenance will also be of.
Items
- Dashboard > Articles : If you have a news/blog page, your articles will appear here. They will be sorted from oldest to newest. The options bar at the top of the page lets you choose which columns to display: author, categories, tags, comments, date, and adjust pagination.
- Dashboard > Articles > Add Article : An item to add a new article is located in the Articles submenu in the sidebar. A button in the top left corner also allows you to add a new article.
Categories
- Dashboard > Articles > Categories: WordPress articles work by categories. These allow you to structure your content. This way, you can group your articles by theme. This is what we do on this blog. We have the categories AI , Blogging , Freelancing , SEO , WordPress .
Categories have several advantages:- In particular, they help improve the user experience: people who visit the site can easily find the information they are looking for.
- Optimize natural referencing : in fact, search engines analyze the structure of categories for a better understanding of the hierarchy of content.
- When writing an article, remember to assign it the correct category. Otherwise, the default category will be used.
Be careful not to multiply the categories and avoid duplicates like Novel and Novels for a reading blog, for example.
- The Categories pageplace enables you to form the various categories on your blog. The default category that you have already created is the uncategorized category that was created upon the installation of WordPress. Make sure to rename it. An uncategorized post will result in a perception of an amateurish or a carelessly maintained site. It is also a poor aspect in terms of user experience and SEO. Since, to the search engines and visitors, it does not state any information about the contents of the post.
Rename it with a relevant name like: To discover, General, News, etc.
- To rename the category “Uncategorized”:
-
- Go to Articles > Categories
- Hover over “Unclassified”
- Click on “Edit”
- Change name and slug
- Save changes.
You can also create subcategories.
In practice, it is best to use only one category per article.
Tags
Tags work in contrast to Categories, although they represent both the types of taxonomies in work with the content.
Categories are obligatory, but not tags. As mentioned above, posts must belong to a category. Categories allow for hierarchical organization. If I take the theme of a travel blog, we would have categories such as:
- Europe
- South America
- Asia
These are general themes.
Tags are used for topics that don’t necessarily deserve a dedicated category. They can cover topics that are similar but fall into different categories.
For example :
- Category: Asia
- Subcategory: Thailand
- Tags: Beach, Tropical, Relaxation.
The person who clicks on “Beach” will find articles that talk about beaches, even if some talk about beaches in other countries.
Media
It is in this place that you will store your images, videos, PDFs, audio files, that you wish to be exhibited on your pages or articles.
These pictures are shown in a grid defaulting. They will be in form of thumbnails. You can select List view and will have access to the information regarding the name of the person who published the photos, the date or when it was published and his name. This opinion can be altered whenever you like.
In order to add media, one should just clik on the sidebar menu section, which has “Add Media File” or on the button located on the top left side.
One can upload the file drag and drop or by choosing the files in your computer. Also, you should ensure that you rename your pictures on your computer before you upload them on your WordPress site. Name them clearly:
ammar-manzar.jpg instead of IMG_0202 .jpg
Your images should be optimized to be lighter. Use .webp format instead of .jpg format .
Once you have clicked on a media, you are given a number of choices: change title, add or update alt text, caption or description. It is also possible to resize, crop, and rotate. Lastly, there is filtering of the type or date of media.
By default, media is sorted by month and year. You can change this by going to Settings > Media and unchecking the box next to “Organize my uploads into monthly and yearly folders.”
Pages
Settings > Pages
Here you have the opportunity to create some static information on your site. They are not sorted by date or category as in the case of the article. It is possible to create pages and add the contents like the contact page, legal notices, page of services, etc.
By clicking on “All pages” you can access the list of created pages. You can read:
- The Title : The name of the page.
- The Author : The person who created the page.
- Comments : With the number of associated comments (if enabled).
- Date : The date of publication or last modification .
The pages are listed in alphabetical order.
Whether for articles or pages, the sidebar on the right allows you to configure them and specify in particular the featured image, the status (draft, pending, private, scheduled, published and password protected), the publication, etc.
When you install WordPress, post templates, page templates, and a fake comment are there by default. Be sure to delete them before you start building your site. To do this, hover over their titles and click Trash.