The Complete 2026 Guide to Installing WordPress on Localhost Using XAMPP
Introduction: Why Your Next Website Should Start Locally
This is one of the situations that occur more frequently than many would like to admit.
One of the freelance web designers secures a new customer. And, eager to impress, they start to experiment with a new plugin on the active WordPress site. The home page crashes within minutes. The client calls. Panic sets in.
The story is not an isolated one. It occurs to both beginners and experienced workers. And nearly every time there is the same root cause, namely, omitting the localhost step.
W3Techs report that as at 2026, the percentage of websites online that use WordPress is more than 43. It is more than a statistic, though, it is an indication of the extent to which WordPress has driven the web design and development economy. The possibility to work in a local environment is no longer a luxury with more than 59,000 plugins contained in the official repository and a freelance Android business in WordPress operating (Upwork lists WordPress as among the top three most sought after CMS skills). It is professional norm.
The following guide will step-by-step guide you through the process of installing WordPress on your Windows 10 or Windows 11 computer using XAMPP. You might be a complete beginner, a freelancer who creates client sites, or a developer who is testing a new plugin, but this tutorial is specifically tailored to you.
No hosting required. No domain purchase needed. No monthly fees. Just your computer, free software, and this guide.
👉 Watch the video tutorial alongside this guide:
What Is Localhost, and Why Does It Matter in 2026?
It is better to stop and comprehend what localhost is before delving into installations and folders, as the notion is an empowering one than most beginners might assume.
Localhost is nothing more than your own computer that is a web server. Rather than leasing server space to a hosting firm, your PC will serve as the server. The installed software (which is in our case XAMPP) replicates the type of environment that web hosting companies provide; Apache to process web request, MySQL to process database, and PHP to process dynamic content such as WordPress.
Consider it in such a manner. A professional chef does not come up with new dishes by offering untested meals to the visitors of restaurants. It is first tested in their kitchen. Localhost is your kitchen. This is the restaurant as the live site.
The Real-World Value of Local Development
According to a 2024 poll by Kinsta, two-thirds of WordPress professionals have some form of a local development environment prior to making a push to a live site. Why is obvious:
- Safe testing: You can destroy and repair without anyone being aware of it.
- Speedy workflow: There is no waiting time on uploads or response of the server. Changes appear instantly.
- Free of charge: No hosting, no domain, no subscription.
- Learning accelerator: You are free to experiment, that is, in relation to the actual development of skills.
- Client protection: Before clients are shown changes they are thoroughly tested.
The payback of the locally built investment is colossal to the freelancers particularly. A crash in a live client project would cost hours in repair time, not only the tarnished professional image of yours but also in some instances, a loss of income. Development of a local building does away with that risk.
Pre-Installation Checklist: Everything You Need Before Starting
Check off this list before clicking on a single download button. It will save you some troubleshooting time in future.
System Requirements
- Windows 10 or Windows 11 (64-bit is recommended)
- RAM Minimum of 4 GB (8 GB preferred to operate safely)
- Free disk space of 2 GB or more to run XAMPP and WordPress.
- Administrative privileges in your computer.
- Virus protection software identified (possibly have to temporarily make changes)
- Identified IIS, Skype, or other applications that operate on port 80 or 443.
Downloads Required
- XAMPP (from apachefriends.org)
- WordPress (from wordpress.org)
Time Required
- Approximately 30 to 45 minutes for a first-time installation
Step 1: Downloading XAMPP, Your Local Server Engine
Your local WordPress setup is XAMPP. It is a free and open-source software bundle created by Apache Friends and it installs your Windows machine with Apache, MySQL (through MariaDB) and PHP. A combination of all these three elements forms a very precise kind of environment that WordPress needs to operate.
The name itself, XAMPP is also a set of letters, which represent the X abbreviation as cross-platform, A as Apache, M as MariaDB, P as PHP, and the second P as Perl.
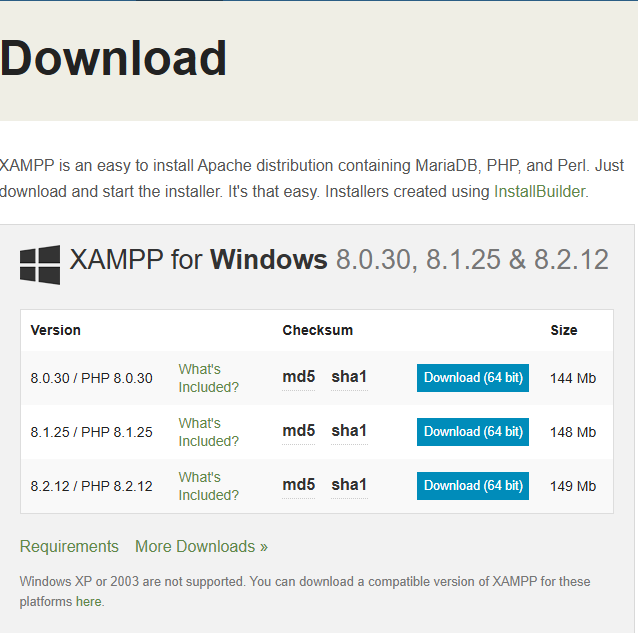
How to Download XAMPP
- Launch your browser and go to the web site https://www.apachefriends.org.
- Neither will you need to have knowledge about your operating system. Click the Windows Download.
- Something to remember is that you should save the installer file in a place that you can get easily, e.g. in your Downloads folder.
- The file will be called such as xampp-windows-x64-8.x.x-installer.exe.
Pro Tip: Always download XAMPP from the official Apache Friends website only. Third-party sources may bundle additional software you do not want.
Step 2: Installing XAMPP on Your Windows Computer
After the download is succeeded, you are now ready to install. It is simple but there are some possible options during the process that should be highlighted.

The Installation Process, Step by Step
2.1 Run the Installer
Find the file that is downloaded and double-click on the file to start the installer. A User Account Control prompt will appear in Windows, in which case you should click Yes. XAMPP is a valid application, if your antivirus software throws you a warning. It is safe to click Continue or Allow.
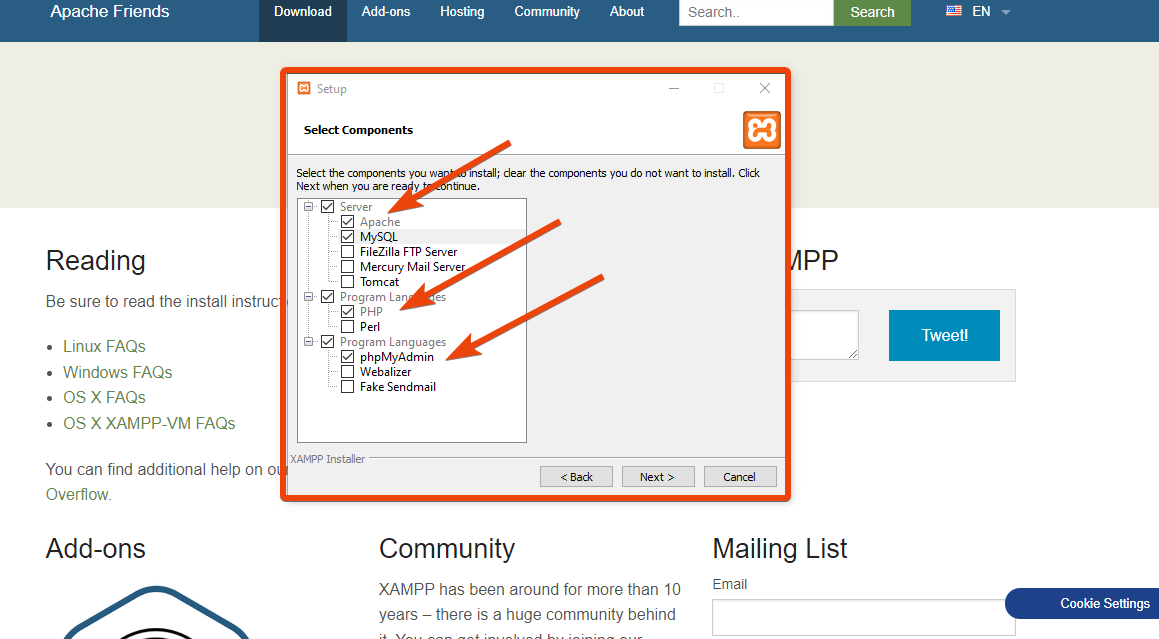
2.2 Choose Your Components
The installer will give a list of the components. With a WordPress local installation, you just require three:
- Apache (required)
- MySQL (required)
- PHP (required, usually pre-selected)
The rest of the elements like FileZilla, Mercury Mail, and Tomcat are optional and not essential to WordPress. Unchecked them to make the installation light and clean.
2.3 Choose the Installation Folder
The default directory is C:xampp. It is highly advisable to retain this default unless there is a particular reason why you intend to amend it. Changing the location of the installation may lead to path error in future.
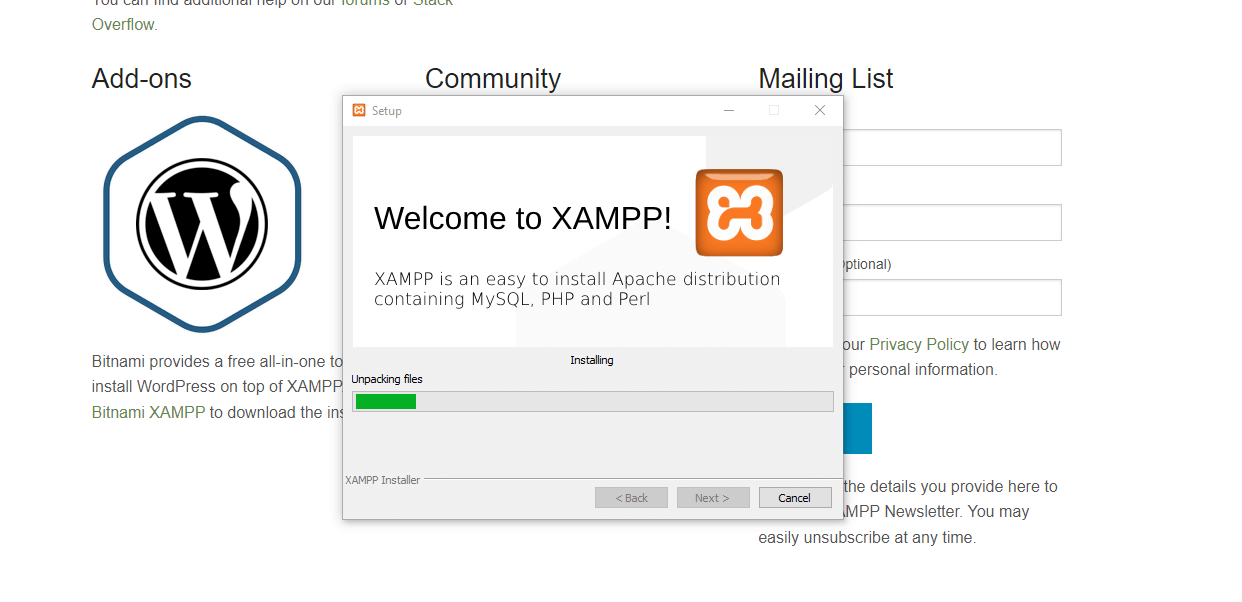
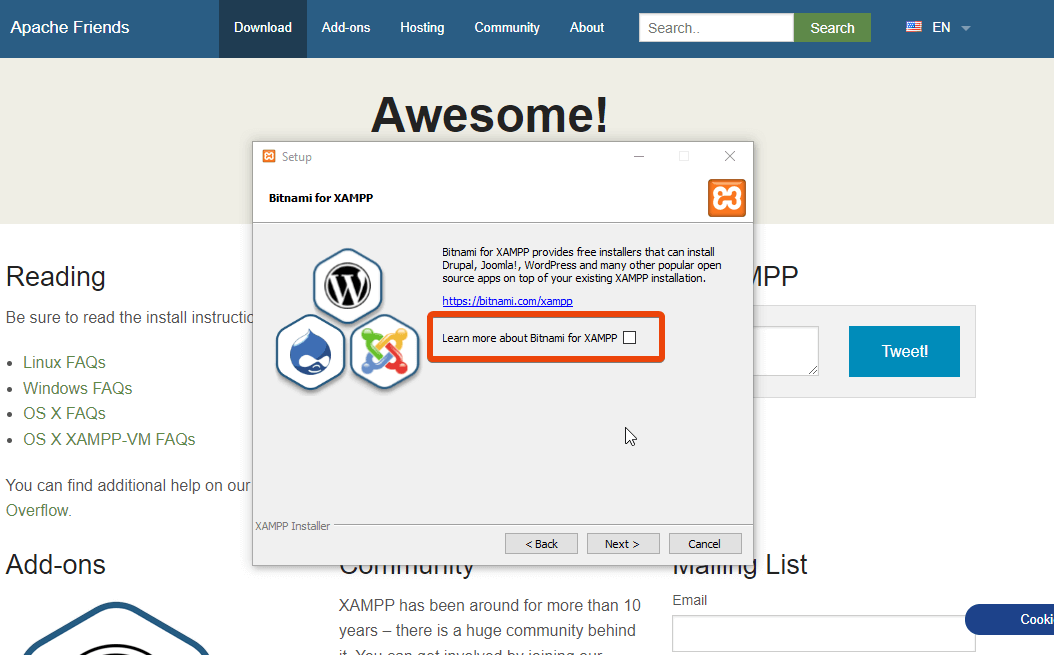
2.4 The Bitnami Prompt
When installing it, there will be a screen which will be like to Learn more about Bitnami to XAMPP. This is a non-essential option. Cleared out the box and proceed.
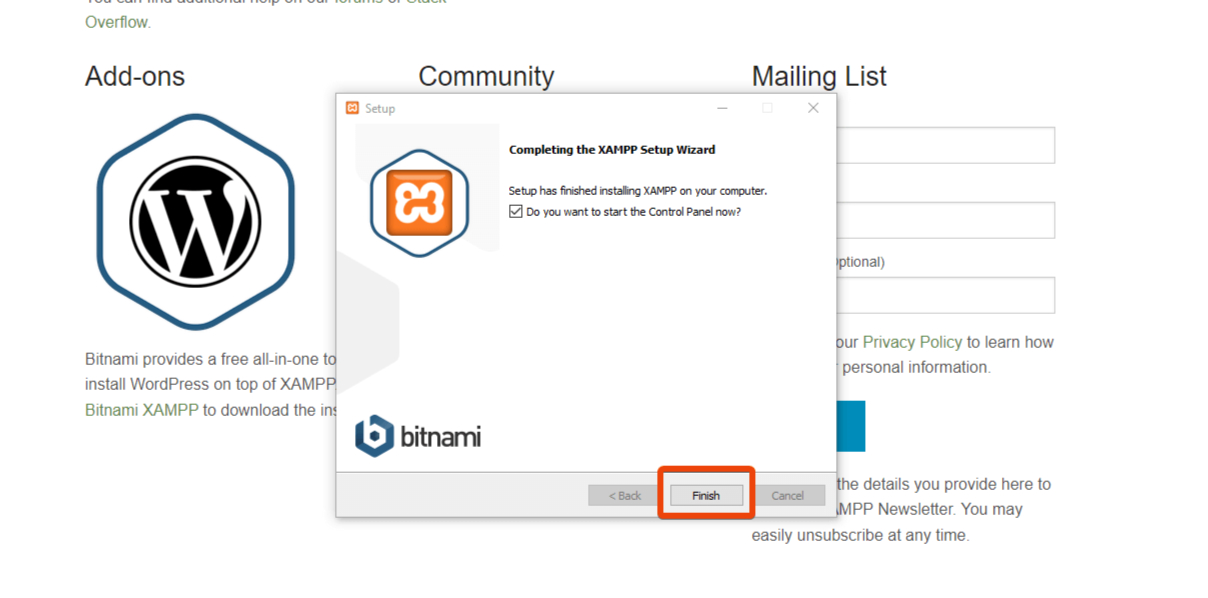
2.5 Complete the Installation
Click Next on the rest of the screens and permits the installation to run. When it is completed, a dialogue will prompt to open the XAMPP Control Panel. Check Finish with this option.
Verifying the Server Works
To check that everything is working, go to any web browser and type in the following addresses:
- http://localhost — Should show the XAMPP welcome page (confirms Apache is running)
- http://localhost/phpmyadmin — Should load the database management interface (confirms MySQL is running)
-
Click Start next to Apache
-
Click Start next to MySQL

Both modules have a Start button. Both modules would be green after being turned on.
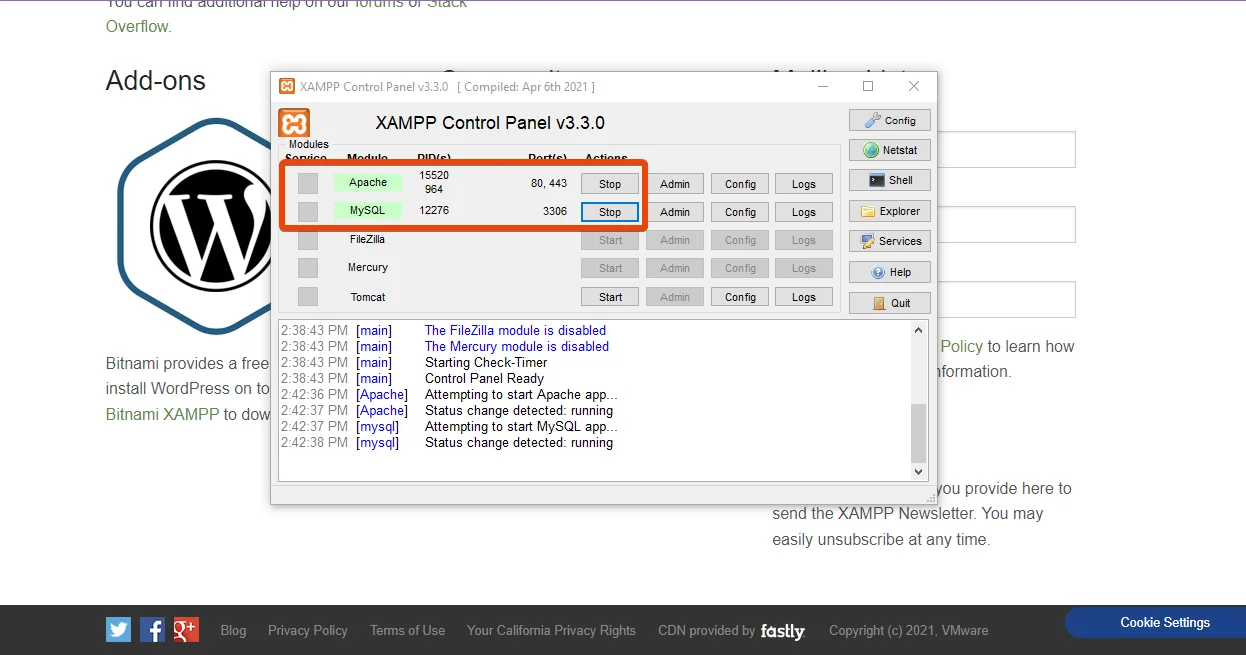
✔ If both services turn green, it means they are running correctly.
❌ If they don’t start:
Troubleshooting: When Apache or MySQL Will Not Start
If Apache will not start:
- It will probably be used with port 80 or port 443. Web server software such as Skype, IIS, or others, are common culprits.
- Start XAMPP Control Panel, and under Apache, locate the Config button and choose the one that is htdconf.
- Find the line ‘Listen 80’ and change it to ‘Listen 8080’.
- Close and again start Apache. You can now access your local site at http://localhost:8080.
General fix that resolves most startup issues:
- Right- click on XAMPP Control Panel shortcut, and choose to run as Administrator. A host of startup issues are merely permission-minded.
Step 4: Downloading WordPress
As XAMPP ensures the server environment, WordPress offers the real content management system. Localhost is a separate installation that up to now requires downloading WordPress as opposed to a hosted install where you simply access the hosting platform and install WordPress.
Getting the Latest Version of WordPress
- Open your browser and go to https://wordpress.org
- Click the blue Get WordPress button
- On the next page, click Download WordPress to get the latest version (6.5+ as of 2026)
- Save the ZIP file to your Downloads folder
Why Always Download the Latest Version? WordPress releases regular updates that include security patches, performance improvements, and new features. Starting with the most recent version means your local installation mirrors what is currently running on modern live websites.
Step 5: Setting Up the WordPress Folder in XAMPP
That is the point where your WordPress setup will be installed on your computer. The XAMPP setups have a predetermined root folder called htdocs where all the local sites run. Consider it as the equivalent of the public -html directory on a traditional web hosting account.
Extracting and Placing WordPress
- Go to your Downloads folder and find the wordpress- 6.5.zip file you just downloaded.
- Right click on the zip file and choose ‘Extract All’ (WinRAR or 7-Zip).
- Once it is extracted, all you have will be a folder called wordpress.
- Copy/topaste this folder to: C:\xampp htdocs.
- Change the title of the folder to a meaningful name. This is added to your local web address.
URL examples based on folder naming:
- C:\xampp\htdocs\myportfolio accessed at http://localhost/myportfolio
- C:\xampp\htdocs\clientsite accessed at http://localhost/clientsite
- C:\xampp\htdocs\testshop accessed at http://localhost/testshop
Naming Tip: Use lowercase letters only, no spaces, and no special characters. Hyphens and underscores are fine.
Step 6: Creating a MySQL Database in phpMyAdmin
WordPress uses a database to store all the data: your posts and pages, settings and user accounts, the settings of the various plugins, etc. You can create this database manually in a localhost setting with phpMyAdmin, the database management tool built in to XAMPP that is web-based.
Creating Your WordPress Database
- Open your browser and enter: http:localhost/ phpmyadmin.
- After phpMyAdmin has loaded, you should see the Databases tab at the top of the screen which you click.
- In the Create database section, enter the name of your database (e.g., myportfolio /db, testshop /db).
- Select the default dropdown collation, or utf8mb4_general_ci to make maximum use of Unicode.
- Click on the Create button.
Important: Write down the exact database name you chose. You will need it in the next step, and any typo will cause a connection error.
Step 7: Running the WordPress Installation Wizard
This is when all it comes down to. Now that you have your server in operation, your WordPress files saved and your database existing, it is high time to start the WordPress installation wizard.
Launching the Wizard
Enter Database Info
-
Database Name: wordpress_db
-
Username: root
-
Password: (leave it blank)
-
Database Host: localhost
-
Table Prefix: wp_ (or leave default)
Click Submit, then click Run the Installation
Set Up WordPress Site
-
Site Title: Your site name
-
Username: Admin name (e.g., admin)
-
Password: Choose a strong password
-
Email: Optional but recommended
-
Click Install WordPress
Open a browser, and enter the URL of your folder name. To illustrate, in case you titled your folder as myportfolio: http://localhost/myportfolio.
WordPress will notice that it is not configured and automatically start the set up wizard.
Step 5: Install WordPress on Localhost
-
Enter the following in your browser; http://localhost/facebook.
Tp (substitute facebook with your folder name) -
WordPress configuration wizard will come out.
Enter Database Info
-
Database Name: wordpress_db
-
Username: root
-
Password: (leave it blank)
-
Database Host: localhost
-
Table Prefix: wp_ (or leave default)
Click Submit, then click Run the Installation
Set Up WordPress Site
-
Site Title: Your site name
-
Username: Admin name (e.g., admin)
-
Password: Choose a strong password
-
Email: Optional but recommended
-
Click Install WordPress
Step-by-Step Through the Wizard
7.1 Select Your Language
Select a language you would like to use in the dropdown menu and proceed.
7.2 Fill in Your Database Connection.
It is the most important screen during the setup process. Enter the fields in the following way:
| Field | Value |
| Database Name | The exact name you chose in Step 6 (e.g., myportfolio_db) |
| Username | root |
| Password | (leave completely blank) |
| Database Host | localhost |
| Table Prefix | wp_ (default is fine) |
What is the password blank?? The default MySQL configuration of XAMPP does not include a password to the root user in a local set-up. That is just to make it easily developable locally and is not a security issue because the database can only be accessed by your own machine.
7.3.1 Add Your Site Information.
Having verified the connection to the database, WordPress will ask you to configure the front end settings of your site:
| Field | Guidance |
| Site Title | The name of your website (can be changed later) |
| Username | Choose a memorable admin username (avoid ‘admin’ for security habit-building) |
| Password | WordPress will suggest a strong password; use it or create your own |
| An email address (can be a placeholder for local development) | |
| Search Engine Visibility | Check ‘Discourage search engines’ for local development sites |
Click Install WordPress. The success page will be shown within a couple of seconds in WordPress. Hit Log In and enter the username and password that you have just created. Dashboard of your WordPress.
Step 8: Post-Installation Setup
The installation is complete, and when you make some extra efforts to configure it to be environmentally valid to develop something really useful, your localhost environment is a truly powerful one.
Post-Installation Checklist
Configure Basic Settings:
- Set your Timezone under Settings > General
- Set Permalinks to ‘Post name’ under Settings > Permalinks
- Update the Site Title and Tagline if needed
Enable Debug Mode:
Open C:\xampp\htdocs\yourfoldername\wp-config.php in a text editor. Find the line define( ‘WP_DEBUG’, false ); and change false to true. This enables error messages that help you identify problems during development.
Install Essential Development Plugins:
- Query Monitor: Displays database query, hook, conditional, etc. Prerequisite to performance testing.
- WP Cleanup: You can quickly install and uninstall WordPress and can also cleanup your WordPress environment with the willingness to create a new one.
Real-World Use Cases: How Different Professionals Use Localhost
When it becomes clear who gains when choosing to have a local WordPress environment, the work will be worthwhile. These are three real-life situations that demonstrate the value.
Freelance Web Designer.
Maria is a freelance web-designer which creates WordPress websites to small business customers. Prior to learning about localhost development, she was making changes directly to client websites, which would at times cause visible errors at times of business hours.
By installing XAMPP, her workflow changed. She will now develop all new client sites on-site, and then test the entire design and all the plugs before the site actually goes online. Her scores in customer satisfaction enhanced and she also used to do away with the panic in the middle of the night to correct the broken live sites. Localhost is not only convenient to freelancers such as Maria, but also a professional requirement.
The WordPress Student
Ahmad believes in learning WordPress to embark on a career change in a digital marketing career. He desired to work with Elementor, WooCommerce and types of themes, which he could not provide hosting to learn.
In this instance, Ahmad can have free unlimited experimentation time as he sets up WordPress in localhost. He destroys, repairs, tests new lay-outs, and develops confidence, without it costing him a penny. It is how many of the more experienced folks in WordPress began.
The Plugin Developer
Sana develops tailor-made WordPress plugins to customers and marketplace. All of her plugins are supported with a long local test-run. She rocks several XAMPP installations, which have various versions of WordPress to test compatibility across versions. Localhost is non-negotiable to developers such as Sana. It forms the basis of a professional development pipeline.
Common Installation Problems and How to Solve Them
Despite such a clear guide, things may get off-track. These are the most common problems and how they can be solved.
Problem 1: Database Connection to make an error.
This error message is almost invariably the result of a mismatch between the database name as specified in the wp-config.php and the real database name in phpMyAdmin; MySQL having not been started as expected in XAMPP; or an error in typing the username or password field.
Resolution: Open XAMPP and make sure that MySQL appears as Running and then make sure that there are no mismatches in your wp-config.php file. Username should be ‘root’ and password should be blank.
Problem 2: Apache Boots up and Shuts down on the Spot.
Another application e.g. Skype or IIS is using port 80.
Solution: In Step 3 use the instructions to change the port or quit the conflicting application and start up Apache.
Problem 3: phpMyAdmin Shows ‘Access Denied’
This normally occurs when there has been an inadvertent setting of a MySQL password.
Solution: Opening the XAMPP Shell through the Control Panel and execute: mysqladmin -u root password (empty quotes) to change it to blank..
Problem 4: WordPress Files Not Found (404 Error)
The URL in your browser does not correspond to the htdocs folder.
Solution: Make sure that your WordPress folder is located right within the C:xampphtdocs folder and that your browser address reflect their folder name, with uppercase.
Issue 5: WordPress is not loading fast on Localhost.
This can typically be a delay in DNS lookups, which introduces a perceptible delay.
Solution: Select WordPress settings/general and make changes in the two URLs by replacing the content of both with the content: http:127.0.0.1/yourfolder. The numerical IP circumvents the DNS resolution and loads significantly quicker.
Comparing Local Development Tools: Why XAMPP Remains the Top Choice
XAMPP is not the only choice of local WordPress development. This is a short comparison of why this guide is devoted to XAMPP.
| Feature | XAMPP | Local by Flywheel | Laragon | Best for |
| Cost | Free | Free (basic) | Free | All |
| Ease of Setup | Moderate | Very easy | Easy | Beginners |
| WordPress-specific | No | Yes | No | General |
| Resource Usage | Low | Higher | Low | Low-end PCs |
| Multi-version PHP | Manual | Built-in | Built-in | Developers |
XAMPP can be used by people who are learning or slightly advanced as it will teach you how to use local servers in real life as opposed to putting all that behind the scenes. Knowing XAMPP, you know web hosting, in general, which makes you a more rounded developer or designer.
WordPress on Localhost in the Context of AI-Powered Development (2026 Trends)
In 2026, the world of WordPress development is changing very fast and the use of localhost environments is gaining further prominence in professional development.
The world of artificial intelligence tools has become an intrinsic part of the WordPress environment. AI-powered plugins are capable of creating content, optimizing pictures, and writing snippets of code. It is democratic to first test AI-powered plugins before utilizing them in a site, which is the correct thing to do. The AI behavior may be unpredictable and it is very important to have knowledge about the interaction of the AI tools within your theme and with other plugins.
A 2024 report by WPEngine found that AI-assisted content generation plugins are the fastest-growing type of website-editor WordPress plugins, with downloads increasing faster by 340% over 2022. All developers or digital marketers that are venturing into these tools require a secure local environment to test these tools.
There is also a projected market of 9.19 billion in the global freelance platform market by the year 2030 (Grand View Research). According to major freelancing sites, WordPress knowledge, and, more particularly, the active operation in the local developmental settings is always listed among high-value skills by clients.
Advanced Tips for Getting More Out of Your Localhost Setup
As soon as you become familiar with the fundamentals, these practices will scale up your local development workflow.
Use Local Sites Multiple.
You can have as many additional WordPress installations running at the same time on localhost that you would like. Just set up a new folder in htdocs and a new database in phpMyAdmin directory on each project. This allows you to have different environments in use by different clients, different WordPress versions or different types of projects.
Transfer a Local Site to Live Hosting.
The work of migrating to the local site is easy with the help of such tools as All-in-One WP Migration or Duplicator when it is time to move to the local site and go online. Connect the plug to your local, pack it and then import to your live hosting. The whole site translates well.
Keep XAMPP and WordPress Updated
Although it is not always safe to update XAMPP during projects, new projects began using the current version are almost always up to date on the latest PHP versions, matching well with any modern live hosting environment.
Add Bookmark New Tab
Make browser bookmarks of your local project URLs. A tidy bookmarks folder of all your projects in localhost helps to save time and keep your work orderly.
Frequently Asked Questions
Can I run WordPress on localhost without internet access?
Yes. After the installation of XAMPP and WordPress, your local site works locally. Your site requires no internet connection to develop it, test it or view it.
Are localhost development hacker-safe?
Yes. Local WordPress site cannot be accessed via the internet. The only way it can be accessed by outside users is by enabling your network to permit this to happen.
Is it possible to use my localhost site on a live hosting in the future?
Absolutely. The migration plugins such as All-in-One WP Migration make it easy. Local build, test, and then live.
What is the number of WordPress sites that I can host on localhost?
Up to the resources of your computer. In htdocs, each site is assigned a folder and in phpMyAdmin, a database.
WooCommerce: Is localhost supported in the development of WooCommerce?
Yes. The WooCommerce is fully compatible with localhost. In fact it is the best place to establish and experiment an online shop and before it even handles a single order.
Final Thoughts: Build Boldly, Test Locally
It is realistically liberating using the full WordPress development environment on a machine which is fully under your control.
No rental fees. No fear of specially ruining a site of a client. No time wastage as you wait to the slow server uploads and then you check whether the CSS change appears correct. Only you and your computer, and a complete, full-fledged, professional grade set of WordPress with which you can experiment, learn, build and create.
These are steps, which have been proven and which are practical, and applied by thousands of WordPress professionals worldwide. You are just beginning your web design, expanding your freelance business or constructing your hundredth website, the localhost habit is a habit that can always be profitable.
Install XAMPP. Download WordPress. Create a database. Run the wizard. Then start building.